Projects From the De-Stash Table

At our guild’s January meeting every year we have our De-Stash. Members bring any quilting related or other craft items that they want to get rid of. The items are put out on tables and the members get to pick through them and take home anything that they want. Any unclaimed items at the end of the night are donated to a local thrift shop that benefits a Women’s shelter.

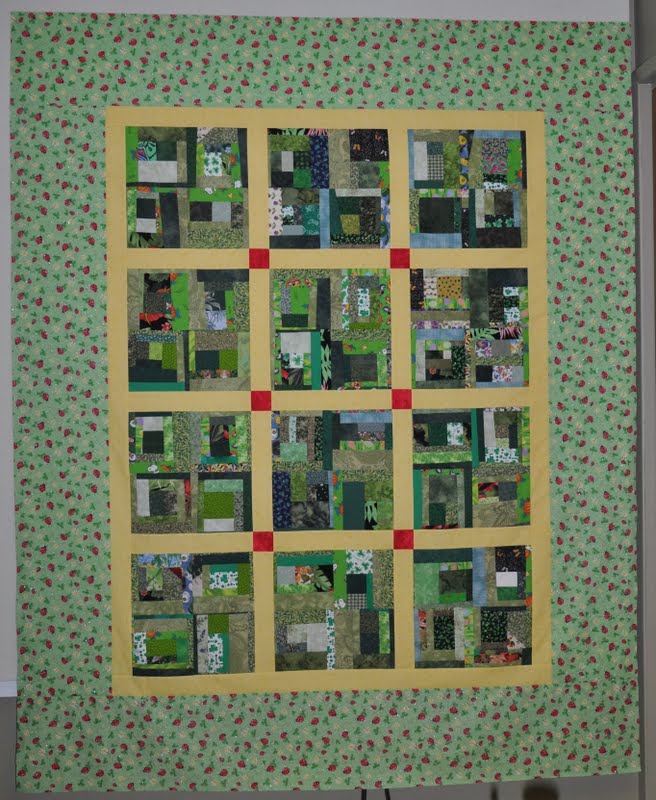
About three years ago during De-Stash, I picked up a large ziplock bag of pieced triangles and some 2.5 inch strips from a jelly roll. I pulled out the triangles and tried to piece them into hexagons. The piecing wasn’t the best by the original quilter so piecing together into hexagons was a frustrating exercise. I finally gave up on that idea and just started to randomly piece them together in an improv fashion. Once I had a large unit pieced together, I trimmed it square into a block. This is the resulting quilt top. The blue sashing strips were in my stash. The Moda fabric on the border was something I picked up at last year’s De-Stash night.

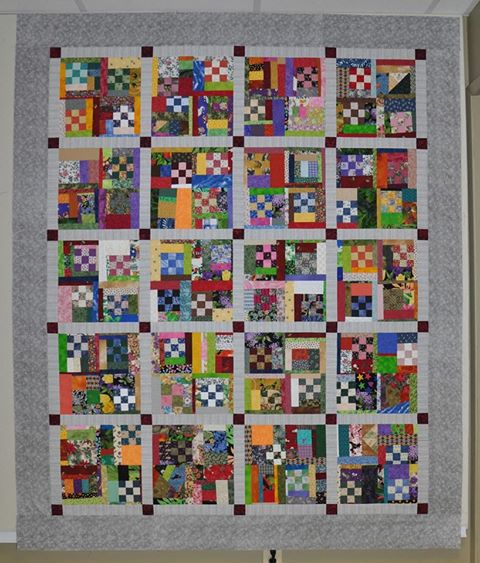
This quilt top was made from the 2.5 inch jelly roll strips that were in that ziplock bag. I pieced string blocks and then put them together with the beige tone on tone fabric from my stash to make string pieced half square triangle blocks. I played with the placement of the blocks until I got a layout that I liked given the number of blocks that I had.

The COVID-19 pandemic has prevented us from attending in-person guild sew-ins since March. For the last two Friday nights I have hosted Zoom sew-ins for members of our guild from 6 pm to 10 pm. These on-line sew-ins have been well attended which confirms that our membership is craving social interaction. These sew-ins have proved productive for me and have jump started my quilting again. I finished putting these two tops together to the flimsy stage during these sew-ins.

Scrap Vortex

Scrap Vortex - 64" x 73"

Scrap Vortex – 64″ x 73″

I have been watching other blogs and Pinterest as quilters followed Crazy Mom Quilts’ Scrap Vortex Quilt Along.  Seeing the scrap quilts progress reminded me of my stack of crumb blocks that have been languishing on the shelf.  I decided last weekend to start sewing them together and finished the flimsy this weekend.

I did not put my squares together like was suggested in the quilt along.  My blocks are pieced as strips of scraps similar in size like you would piece coin quilts.  I then join the strips together and square them up into blocks.

This quilt is a bit busy.  I will go ahead and quilt it and then see if it needs something else added.  I have a vision of adding some circular appliques randomly across the top.  For now it is hanging in the closet waiting its turn on the long arm.


Guild Quilt Show

Our quilt guild’s bi-annual show was this past Friday night and Saturday (October 17 and 18, 2014).  I was once again on the committee that hung the quilts.  We were very organized this year and had the quilts hung in record time.

I was also doing demos again this year. Unlike some other quilt shows, our guild does not just do demos at specific times during the show.  Our demos are on-going through the whole show.  This means that the people that are doing the demos are doing lots and lots of talking.  🙂  There were four of us doing demos this year.  We had the most perfect spot with perfect lighting against this bank of windows.

DSC_0938

This was my home for a day and a half while I demonstrated how to make string/crumb blocks using a stabilizer.  I use used color catchers as my foundation, but any other stabilizer product such as muslin or paper could be used.  If you use paper, you will have to remove the paper before quilting your quilt.  This is one reason why I use the color catchers–there is nothing to remove; the color catcher is not removed and stays in the quilt.  Granted the quilt is a bit heavier because of the additional layer.

The woman doing demos beside me was demonstrating another technique for using up scraps–making those fabric wrapped bowls that are so popular now.  We were very complimentary to one another with our demos as we were both showing how to use up scraps that some people put would put in the trash.

The quilts that I entered in this year’s show were:

~Yin and Yang

DSC_0575DSC_0577 DSC_0576

~Mexican Tiles

DSC_0619 DSC_0620 DSC_0621 DSC_0622

~The Pumpkin Patch

DSC_0583 DSC_0584

~Christmas Corners

DSC_0812 DSC_0813

~Home is the Best Place to Bee

DSC_0883


And lastly, my entry into the challenge for this year’s show; Roses are Red, Violets are Blue.

DSC_0872I was very tired by the time I got home after quilt show take down last night.  …but ask me in two years if I am ready to do this again and my response will be a definite, Yes!!!


Crumb Blocks Find a Home

I had a large pile of crumb blocks that desperately needed to find a quilt home.  These blocks have been sitting on the shelf in my studio for years collecting dust.  As we all know, blocks on a shelf do not do much for warming a body or soul.

So, recently, I took that stack of 40 crumb blocks off the shelf and transformed them into two large lap size quilt tops. (62″ x 74″).

At one point I had all 40 blocks sewn together into one large quilt top without sashing and cornerstones.  I wasn’t happy with the chaotic look of that top and so I picked out the seams and stacked the blocks back on the shelf.  The blocks sat for a few more years without being touched because of the memories invoked by all that reverse sewing that I did!

crumb1 crumb2Each crumb block is pieced together from 4 smaller, 6″ square crumb blocks.  There is everything in these blocks–nine patches collected from a guild nine patch block exchange many years ago, scraps of fabric from leftover quilts made for Christmas, Valentine’s, Easter, floral, and other themed quilts.  These quilt tops are truly a trip down memory lane.  It always surprises me how much emotion and memories can be triggered by looking at the scraps of fabric in one of these quilts.

Fabric requirements for each quilt:

20 crumb blocks – 11.5″ square

Sashing – 34″ WOF cut into 17 – 2″ wide strips, subcut into 49 – 11.5″ strips

Border – 35″ WOF cut into 7 strips – 5″ wide

Backing – 4 meters


Green Crumb / Ladybug Flimsy

I spent time working on a super secret project yesterday that I can’t say anything about or show any pictures of.  However, last night I decided to put the borders on this top and get it moved off the design wall.  This is a top made from green crumb blocks.  I joined 4 green crumb blocks together to make a 12.5″ block and then sashed them with 2.5″ yellow strips using red cornerstones.  The yellow plays off the daisies in the border print and the red plays off the ladybugs in the border print.  This top was completely made from stash.

This top currently measures 63″ x 77″.  Another top finished to the flimsy stage.