Flimsy Re-Do

2015_September 7_Sunbonnet Sue Redwork_Flimsy Revised_44 in x 57 in-Optimized

I couldn’t stand it.  Yesterday I thought I had my Sunbonnet Sue Redwork quilt finished to the flimsy stage, but the red border that I had on it just wasn’t working for me.  So after staring at this quilt top on the design wall for the morning, I decided to just remove that red border.  I think that red fabric was a little too heavy and overpowering for the blocks.  Here it is, in its revised finished flimsy stage – now measuring 44 in x 57 in.  I will go ahead and add this one to the “to be quilted” pile.

Disappearing Four Patch

D4P - Flimsy - 64" x 75"

D4P – Flimsy – 64″ x 75″

Linda, Cher, and I have been planning a sew-in for some time now.  Last weekend – June 29 and 30 – was the weekend that we had set aside to sew together.  After sewing most of last weekend and all of today, I have a finished flimsy.

Linda had said that she wanted to make a blue and white quilt for some time now and she thought that the Disappearing 4 Patch (D4P) block would be just the ticket.  One of the first bed sized quilts that I made was a blue and white quilt so I wasn’t interested in the blue and white colourway.  However, the D4P did sound interesting.  Originally, I was going to make a red and white version.  However, I went through my stash looking for something to test the pattern and came across some pre-cut scrappy 6.5″ squares.  I made three blocks from those squares and decided that I would just keep going with that stack of scrap fabric squares.  I added Kona White to the mix as a background to update the feeling of the quilt as these squares are old!  I will save the red and white fabrics for another project.

My D4P version is a generous lap size with the flimsy finishing at 64″ x 75″.

I was so pleased that I had used up almost all of the pre-cut squares in the making of this project and then I came across another bin of 6.5″ squares.  It looks like I will need to make another project or two to finally see the bottom of that pre-cut fabric bin.

String Half Log Cabin – Flimsy

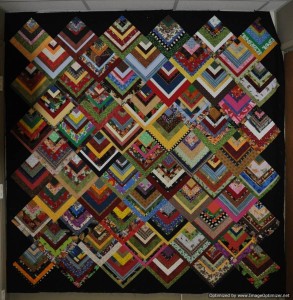
Back in 2010, I was inspired by a blog post written by Kim Brackett.  Kim’s String Block Tutorial was easy to follow and I started making a pile of string blocks using her technique.  Kim never did post a picture of her finished quilt on her blog so I am not sure how she set her string blocks in her finished quilt.

I played around with various settings for my blocks and decided that I liked the blocks set on point best.  Today, I finally finished sewing my blocks together into a top.  My blocks finished at 9 ” square.  At this stage, my quilt top measures approximately 78.5″ x 79.5″.  I haven’t decided whether or not I will add a border to this quilt.  I like the look of the top without any further borders–the large chaos of colour seems to float on the quilt top.  However, I will likely regret not adding a border to stabilize the edges of this quilt when it comes time to quilt it.  I am sure that keeping the on point setting of the blocks with the bias edged setting triangles square while quilting will be a challenge I am sure.

It took me 4 1/2 years to get my blocks finished and set into a quilt top.  Let’s hope It doesn’t take me another 4 1/2 years to turn this quilt top into a finished quilt.  🙂

The next time I make this quilt, I think I will make the first square of this block the same size and from the same fabric.  I think this will help to “tame” some of the wildness of this quilt and give the eye a place to rest.

2015_January 29_String Half Log Cabin_Flimsy-Optimized


I recently purchased Fons and Porter’s Easy Diagonal Sets Ruler.  This ruler was a big help when it came time to cut the setting triangles.  The following link will take you to a video that demonstrates how to use the ruler:  https://www.youtube.com/watch?v=iBfDsLP3P9I

I usually use the method of cutting setting triangles as described by Marti Michell in her book, Quilting for People Who Still Don’t Have Time to Quilt.  Marti says to:

Just cut a larger square on both diagonals to yield four setting triangles.  To determine the size of the larger square, measure the diagonal of the finished size unit block, and add 1 1/4 inches.  this is the size square to quarter for perfect-fit, no-mistakes-allowed setting triangles.  I prefer to add 1 1/2 inches to 2 1/2 inches to the diagonal measurement of the block.  That size square will yield slightly larger setting triangles which allow the design blocks to float inside the borders.

Using Marti’s method, I would have been cutting my squares 15 1/2″ square in order to get 4 setting triangles.  In order to cut enough squares this size for my setting triangles, I would have needed more black fabric than I had on hand.  However, using the ruler, I was able to cut my setting triangles from narrower strips of fabric and still have some fabric left over.

Funky Pinwheel – Queen Size

Back in November 2014, I fell in love with a quilt that I was quilting for Darlene R.  It turns out that the quilt was made utilizing some clever acrylic templates made and sold by Jodi Nelson of Pleasant Home.

il_570xN.266508401

The templates were perfectly designed to cut 5″ charm squares with the perfect angle to make the Funky Pinwheel block.  This is the quilt. I quilted it with my Swirls template which gave the blocks the appearance that they were turning in the wind–the perfect quilting template for this quilt!

Customer Quilt

Customer Quilt

I contacted Jodi Nelson to see if I could purchase a set of templates from her.  As it turns out, Jodi is no longer selling her templates.  Darlene was very generous and loaned me her templates so that I could make my own Wonky Pinwheel quilt.

13 - Wonky Pinwheel - this one needs quilting & binding

Funky Pinwheel – flimsy – 95″ x 103.5″

I worked on my Wonky Pinwheel quilt over the Christmas/New Year’s season and finished it to the flimsy stage on January 2, 2015.  This is a large quilt – finishing at 95″ x 103.5″.