I needed a better system for organizing my quilt backings. I had folded the fabrics that I had purchased for future quilt backings on my bookcase shelves. However, when I would go looking for the perfect backing I would pull out backings from the pile and measure the yardage only to find out the piece I had selected wasn’t suitable in quantity for the quilt I was wanting to quilt. After doing that a few times, I would have a mess on the shelf from pulling fabrics out of the middle or bottom of the pile and the fabrics that weren’t selected would then accumulate on the floor. Although having fabrics nicely stacked on shelves may look neat, it doesn’t seem that this is a practical way for me to store and manage my backing fabrics.
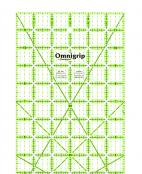
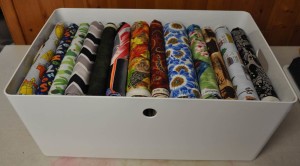
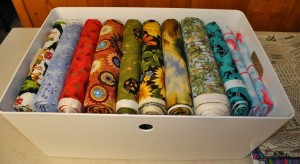
I went to IKEA with a friend this week to see what they might have as a storage solution for my quilt backings. I came home with two large Kuggis boxes. (14.25″ W x 21.25″ D x 8.25″ H) I measured the yardage I had for each backing and recorded the number of inches, number of yards, and number of meters as well as a description of the print into a spreadsheet. (Once I had the number of inches, I used formulas to convert to yards and meters since I was using Excel.) I folded my fabric lengthwise twice so I could use my 6″ x 12″ Omnigrip ruler to roll the fabric to a uniform size. My fabric ended up in a nice neat rectangular shape that fit perfectly into the Kuggis box.  I added a hard copy of the spreadsheet to the box. Because the fabric is stored on its end using the KonMari Method of folding, I can easily see all backings at a glance and I can pick the backing that best suits my quilt top. By referring to the spreadsheet, I can easily determine if there is sufficient yardage without having to pull the fabric out and measure it.
BACKINGS – Box #1
In Inches In Yards In Meters Description
182 5.1 4.6 Construction
206 5.7 5.2 Cacti
124 3.4 3.1 Blue alphabet
206 5.7 5.2 Gray & black chevron
202 5.6 5.1 Green with pine branches & pinecones
174 4.8 4.4 Black with cars
300 8.3 7.5 Fall with red, green, & yellow leaves
144 4.0 3.6 Red with brown lizards
336 9.3 8.4 Blue daisies
170 4.7 4.3 Blue roosters on grass
135 3.8 3.4 Brown with bears & deer
206 5.7 5.2 Blue with houses
168 4.7 4.2 Grey background with black cats
In Inches In Yards In Meters Description
216 6.0 5.4 Snowman with cacti
196 5.4 4.9 Blue with glitter / winter
230 6.4 5.8 Red with gold Christmas trees
240 6.7 6.0 Green with black cats
346 9.6 8.7 Brown with daisies
254 7.1 6.4 Black with gold flowers
250 6.9 6.3 Desert with cacti / Monument Valley
324 9.0 8.1 Palm trees
152 4.2 3.8 Turquoise with Kokopelli
71 2.0 1.8 Blue with pink flamingos – first piece
98 2.7 2.5 Blue with pink flamingos – second piece
In the photo of the closed boxes on the shelves you will see that I have some pieces of fabric stored on top of the boxes. These fabric pieces are wide backings. I haven’t measured these as I only buy wide backings in sufficient yardage to back large queen size quilts.
I still have more backing fabric to organize, but I will need to purchase more boxes. Just a warning though; these boxes are heavy once they are full of fabric so do not store them on high shelves as you may end up dropping a full box of fabric on yourself when you go to remove the box from the shelf!

